前端学习笔记

前端学习笔记

  平生不学WEB,便称编程也枉然 !

HTML

  HTML(HyperText Markup Language)是一种标记语言以便于浏览器正确展示网页给用户。HTML使用标签(tags)来区分用户所能看到的内容和便于浏览器解释的指示。

基础

  常见的IDE比如 Sublime、 VS code都支持一些智能生成HTML代码,简化输入。

  • 用于生成一个html页面,包含head和body。

    1
    >>>!
  • 通过输入标签名快速生成代码块,同理也可以输入h1、img、a等。

    1
    2
    >>>p
    <p></p>
  • 输入标签*数字可以快速生成多个同级标签。

    1
    2
    3
    4
    >>>p*3
    <p></p>
    <p></p>
    <p></p>
  • 也可以用加号连接标签名达到快速生成的目的。

    1
    2
    3
    >>>h1+p
    <h1></h1>
    <p></p>
  • >代表次级,用于快速生成嵌套结构。

    1
    2
    3
    >>>p*2>img+a
    <p><img src="" alt=""><a href=""></a></p>
    <p><img src="" alt=""><a href=""></a></p>
  • 用括号可以生成分组标签。

    1
    2
    3
    4
    5
    >>>(div>p)+(div>img)
    <div>
    <p></p>
    </div>
    <div><img src="" alt=""></div>
  • 生成带id或者class的标签

    1
    2
    3
    4
    5
    6
    >>>div#nav
    <div id="nav"></div>
    >>>div.bar
    <div class="bar"></div>
    >>>div#nav.bar
    <div id="nav" class="bar"></div>
  • 标签后面用中括号可以快速添加属性。

    1
    2
    >>>img[src=logo.jpg]
    <img src="logo.jpg" alt="">
  • 标签后面用大括号可以快速添加段落内容。

    1
    2
    >>>p{峰哥牛逼}
    <p>峰哥牛逼</p>
  • lorem用于快速生成文本。

    1
    2
    3
    4
    >>>lorem
    Lorem ipsum dolor sit amet consectetur adipisicing elit...
    >>>lorem4
    Lorem ipsum dolor sit.

标签

标题

  HTML 标题(Heading)是通过h1 - h6 等标签进行定义的。

1
2
3
4
<h1>这是一级标题</h1>
<!-- 一级标题一般只设一个 -->
<h2>这是二级标题</h2>
<h3>这是三级标题</h3>

段落

  HTML 段落通过p标签进行定义。 

1
2
3
4
5
6
<p>这是段落</p>
<!-- 段落里多个空格会合并为1个空格,因此可以使用&nbsp;来替代 -->
<!-- 段落里换行会被忽略,显示为空格,如果要换行用<br /> -->
<!-- 使用<hr />来添加水平线 -->
<span>段内分组,方便用CSS来修改样式</span>
<pre>预排版标签,以便于保留段内空格、换行等格式</pre>

超链接

  超链接通过a标签进行定义。

1
2
3
4
5
6
7
<a href="网址">文字或图片</a>
<!-- 连接到本站点其他网页 -->
<a href="news.html">新闻</a>
<!-- 连接到其他站点 -->
<a href="https://www.baidu.com/">百度</a>
<!-- 虚拟超链接 -->
<a href="#">版块</a>

图片

  图片通过img标签进行定义。

1
2
<img src="w3school.gif" alt="w3c" />
<!-- alt即为图片替代名字,在未加载出来显示 -->

  块通过div标签进行定义,用于确定一个单独的区域,如页面的一个组成部分、一个栏目版块。

  div元素没有特定的含义。除此之外,由于它属于块级元素,浏览器会在其前后显示折行。

  如果与 CSS 一同使用,div元素可用于对大的内容块设置样式属性。

列表

  无序列表ul,有序列表ol,列表项li

1
2
3
4
5
<ul>
<li>项目1</li>
<li>项目2</li>
<li>项目3</li>
</ul>
  • 项目1
  • 项目2
  • 项目3
1
2
3
4
5
<ol>
<li>项目1</li>
<li>项目2</li>
<li>项目3</li>
</ol>
  1. 项目1
  2. 项目2
  3. 项目3

表格

  表格table, 每个表格均有若干行(由 tr标签定义),每行被分割为若干单元格(由 td标签定义)。字母td指表格数据(table data),即数据单元格的内容。数据单元格可以包含文本、图片、列表、段落、表单、水平线、表格等等。

1
2
3
4
5
6
7
8
9
10
11
12
<table border="1">
<!-- border定义边框粗细 -->
<tr>
<td>row 1, cell 1</td>
<td>row 1, cell 2</td>
</tr>
<tr>
<td>row 2, cell 1</td>
<td>row 2, cell 2</td>
</tr>
</table>
<!-- table>tr*2>td*2 -->
row 1, cell 1 row 1, cell 2
row 2, cell 1 row 2, cell 2
1
2
3
4
5
6
7
8
9
10
11
12
13
14
15
<!-- 表头使用th标签,即将上表修改如下 -->
<table border="1">
<tr>
<th>title1</th>
<th>title2</th>
</tr>
<tr>
<td>row 1, cell 1</td>
<td>row 1, cell 2</td>
</tr>
<tr>
<td>row 2, cell 1</td>
<td>row 2, cell 2</td>
</tr>
</table>
title1 title2
row 1, cell 1 row 1, cell 2
row 2, cell 1 row 2, cell 2
  如果有空格子,使用` `占位,避免不显示边框

表单

  HTML 表单用于搜集不同类型的用户输入,用form来表示。

input

  通过改变type属性,可以得到不同input形态。action属性定义在提交表单时执行的动作,通常为提交的url地址,缺省则为当前页面。

1
2
3
4
5
6
7
8
<!-- text/password -->
<form>
账户:
<input type="text" name="userName" />
<br />
密码:
<input type="password" name="userPsd" />
</form>
账户:
密码:
1
2
3
4
5
6
7
<!-- submit/reset -->
<form>
姓名:
<input type="text" value="" name="myName" />
<input type="submit" value="提交" name="submitBtn" />
<input type="reset" value="重置" name="resetBtn" />
</form>
姓名:
1
2
3
4
5
6
7
8
9
10
11
12
<!-- radio/checkbox -->
<form>
性别:
<input type="radio" value="boy" name="gender" checked="checked" />
<input type="radio" value="girl" name="gender" />
<br />
爱好:
<input type="checkbox" value="music" name="music" checked="checked" />音乐
<input type="checkbox" value="sport" name="sport" />体育
<input type="checkbox" value="reading" name="reading" />阅读
</form>
<!-- checked属性设置成"checked",该选项默认为选中 -->
性别: 男
爱好: 音乐 体育 阅读
1
2
3
4
5
6
7
8
9
10
11
12
13
14
15
<!-- <datalist>元素为<input>元素规定预定义选项列表。 -->
<!-- 用户会在他们输入数据时看到预定义选项的下拉列表。 -->
<!-- <input> 元素的 list 属性必须引用 <datalist> 元素的 id 属性。 -->
<form>
<input list="选择你的浏览器:">
<datalist id="browsers">
<option value="Internet Explorer">
<option value="Firefox">
<option value="Chrome">
<option value="Opera">
<option value="Safari">
</datalist>
<input type="submit" value="提交" name="submitBtn" />
<input type="reset" value="重置" name="resetBtn" />
</form>

select

  select元素定义下拉列表。

1
2
3
4
5
6
7
8
9
10
<!-- select -->
<form>
爱好:
<select>
<option></option>
<option selected="selected"></option>
<option>rap</option>
<option>篮球</option>
</select>
</form>
爱好:

textarea

  textarea元素定义多行输入字段(文本域)。

1
2
3
4
5
6
7
8
9
10
<!-- textarea -->
<form>
个人简介:<br />
<textarea cols="50" rows="10">
在这里输入内容...
</textarea>
<br />
<input type="submit" value="提交" name="submitBtn" />
<input type="reset" value="重置" name="resetBtn" />
</form>
个人简介:

button

  button元素定义多行输入字段(文本域)。

1
2
3
4
<!-- button -->
<form>
<button type="button" onclick="alert('峰哥牛逼')">点我</button>
</form>

语义化

  语义化就是指让网页的含义更加明确,用于清楚地向浏览器和开发者描述其意义。

  非语义元素的例子:divspan - 无法提供关于其内容的信息。

  语义元素的例子:formtable以及 img - 清晰地定义其内容。

  下面列出了以字母顺序排列的 HTML5 新语义元素。

标签 描述
article 定义文章。
aside 定义页面内容以外的内容。
details 定义用户能够查看或隐藏的额外细节。
figcaption 定义 figure元素的标题。
figure 规定自包含内容,比如图示、图表、照片、代码清单等。
footer 定义文档或节的页脚。
header 规定文档或节的页眉。
main 规定文档的主内容。
mark 定义重要的或强调的文本。
nav 定义导航链接。
section 定义文档中的节。
summary 定义 details 元素的可见标题。
time 定义日期/时间。

强调

  emi用于斜体,strongb用于加粗。但是前者有语义,后者没有。

自定义列表

  自定义列表dl,列表项dt,描述dd

1
2
3
4
5
6
<dl>
<dt>HTML</dt>
<dd>超文本标记语言</dd>
<dt>CSS</dt>
<dd>层叠样式表</dd>
</dl>
HTML
超文本标记语言
CSS
层叠样式表

CSS

  CSS 指层叠样式表 (Cascading Style Sheets),样式定义如何显示 HTML 元素,通常存储在样式表中,它的出现,是为了解决内容与表现分离的问题,可以极大提高工作效率。外部样式表通常存储在 CSS 文件中,多个样式定义可层叠为一。

基础

  在IDE中,可以通过快捷的方式生成样式结构。

  • 生成css的link。

    1
    2
    >>>link:css
    <link rel="stylesheet" href="style.css">
  • 常见css缩写:

    1
    2
    3
    4
    5
    6
    7
    8
    9
    10
    11
    12
    13
    /* 在css框内输 */
    >>>w30
    width: 30px;
    >>>h30
    height: 30px;
    >>>mg10
    margin: 10px;
    >>>pd5
    padding: 5px;
    >>>lh2em
    line-height: 2em;
    >>>bgc
    background-color: #fff;

语法

  以下为一个css样式,p为选择器,即选择哪个标签添加样式。为了方便易读,每行代码最好写在一个新行。

1
2
3
4
5
p{
font-size:12px; /*字号*/
color:blue; /*文本颜色*/
font-weight:bold; /*加粗*/
}

创建

内联样式

  由于要将表现和内容混杂在一起,内联样式会损失掉样式表的许多优势。请慎用这种方法,例如当样式仅需要在一个元素上应用一次时。

  要使用内联样式,你需要在相关的标签内使用样式(style)属性。Style 属性可以包含任何 CSS 属性。本例展示如何改变段落的颜色:

1
2
3
<p style="color:red;">
我不会CSS
</p>

我不会CSS

内部样式

  当单个文档需要特殊的样式时,就应该使用内部样式表。你可以使用 style标签在文档头部定义内部样式表,就像这样:

1
2
3
4
5
6
7
8
9
10
11
12
13
14
15
<!doctype html>
<html>
<head>
<style type="text/css">
p[type="css_Demo"]{
color:red;
}
</style>
</head>
<body>
<p type="css_Demo">
我不会CSS
</p>
</body>
</html>

我不会CSS

  这里使用了属性和值选择器,关于选择器,具体后面再提。

外部样式

  当样式需要应用于很多页面时,外部样式表将是理想的选择。在使用外部样式表的情况下,你可以通过改变一个文件来改变整个站点的外观。每个页面使用link 标签链接到样式表。link标签在(文档的)头部,例如:

1
2
3
<head>
<link rel="stylesheet" type="text/css" href="mystyle.css" />
</head>

  浏览器会从文件 mystyle.css 中读到样式声明,并根据它来格式文档。

  外部样式表可以在任何文本编辑器中进行编辑。文件不能包含任何的 html 标签。样式表应该以 .css 扩展名进行保存。

1
2
3
p{
color:red;
}

  这样对于多个页面,就能通过链接进行样式设定,方便维护。

多重样式

  如果某些属性在不同的样式表中被同样的选择器定义,那么属性值将依赖于就近原则。简而言之,优先级内联样式>内部样式>外部样式。

  例如,外部样式表拥有针对 h3 选择器的三个属性:

1
2
3
4
5
h3 {
color: red;
text-align: left;
font-size: 8pt;
}

  而内部样式表拥有针对 h3 选择器的两个属性:

1
2
3
4
h3 {
text-align: right;
font-size: 20pt;
}

  假如拥有内部样式表的这个页面同时与外部样式表链接,那么 h3 得到的样式是:

1
2
3
4
5
h3 {
color: red;
text-align: right;
font-size: 20pt;
}

  即颜色属性将被继承于外部样式表,而文字排列(text-alignment)和字体尺寸(font-size)会被内部样式表中的规则取代。

选择器

标签选择器

  以下面为例,通过bodyh1phr这些标签名来定义相应的CSS。

1
2
3
4
5
6
7
8
9
10
11
12
13
14
15
16
17
18
19
20
21
22
<style type="text/css">
body{
background-color: #ccc;
text-align: center;
font-size: 12px;
}
h1{
font: "黑体";
font-size: 20px;
}
p{
color: red;
font-size: 16px;
}
hr{width: 200px;}
</style>
<body>
<h1>标题</h1>
<hr>
<p>正文段落</p>
版权所有
</body>

类别选择器

  CSS中,类别选择器用一个.显示。

1
2
3
4
5
6
7
8
9
10
11
12
<style type="text/css">
p{font-size: 12px;}
.one{font-size: 18px;}
.two{font-size: 24px;}
</style>
<body>
<p class="one">类别1</p>
<p class="two">类别2</p>
<p>正文段落</p>
</body>

ID选择器

  CSS中,ID选择器用一个#号显示。与类别选择器不同之处在于,它具有唯一性。

1
2
3
4
5
6
7
8
<style type="text/css">
#one{font-size: 12px;}
#two{font-size: 24px;}
</style>
<body>
<p id="one">ID1</p>
<p id="two">ID2</p>
</body>

嵌套声明

  根据文档的上下文关系来确定某个标签的样式。

1
2
3
4
5
6
<style type="text/css">
p span{color: green;}
</style>
<body>
<p>法国男兵法国女兵都是<span>法国士兵</span>。</p>
</body>

集体申明

  用逗号将所有需要申明的选择器分开,这样可以分享相同的声明。

1
2
3
4
5
6
7
8
9
10
<style type="text/css">
h1,p{
color: green;
text-align:center;
}
</style>
<body>
<h1>峰哥牛逼</h1>
<p>黄浦江之王!</p>
</body>

全局申明

  用*表示所有标签均应用申明。

1
2
3
4
5
6
7
8
9
10
11
<style type="text/css">
*{
color: green;
text-align:center;
}
</style>
<body>
<h1>峰哥牛逼</h1>
<p>黄浦江之王!</p>
<h2>不服的沉了!</h2>
</body>

样式

文本

  CSS 文本属性可定义文本的外观。

单位

单位 描述
px 像素
em 字符,自动适应用户所使用的字体
% 百分比,继承自DOM树上一级

颜色

颜色 描述
red,blue,green CSS颜色名
rgb(x,x,x) RGB值,每个参数 (red、green 以及 blue) 定义颜色的强度,可以是介于 0 与 255 之间的整数
rgb(x%,x%,x%) RGB百分比值,取值介于0%到100%
rgba(x,x,x,x) 是 RGB 颜色值的扩展,带有一个 alpha 通道 - 它规定了对象的不透明度,介于0.0(完全透明)与1.0(完全不透明)之间
#rrggbb 十六进制数,参考CSS颜色十六进制值

段落

属性 描述 取值
letter-spacing 字符间距 2px -3px
line-height 行高 14px 1.5em 120%
text-align 对齐 center left right justify
text-decoration 装饰线 none overline underline line-through
text-indent 首行缩进 2em

字体

  font是有顺序的:

  • font:斜体 粗体 字号/行高 字体;
  • font:italic bold 16px/1.5em 宋体;
属性 描述 举例
font 声明设置所有的字体属性 2px -3px
font-family 字体系列 font-family:”Hiragino Sans GB”,sans-serif
font-size 字号 14px 120%
font-style 斜体 italic
font-weight 首行缩进 bold

背景

  空元素需要先定义元素的高度和宽度。

属性 描述 举例
background 声明设置所有的背景属性 2px -3px
background-color 背景颜色 red blue green
background-image 背景图片 url(xxx.gif)
background-repeat 填充方式 repeat repeat-x repeat-y no-repeat

超链接

  以下这种形式也被称为伪类选择器。

  • a:link - 普通的、未被访问的链接
  • a:visited - 用户已访问的链接
  • a:hover - 鼠标指针位于链接的上方悬停,必须位于a:link和a:visited之后
  • a:active - 链接被点击的时刻,必须位于a:hover之后

  示例:鼠标悬停放大字体:

1
2
3
4
5
6
7
8
a{
font-size:22px;
}
a:hover{
font-size:200%
}

<a href=https://www.douyu.com/9999>Rua!</a>

Rua!

列表

属性 描述 举例
list-style 声明设置所有的列表属性 type position image
list-style-image 为列表项标志设置图像 url(xxx.gif)
list-style-position 标志位置 inside outside
list-style-type 标志类型 none square more

表格

常见属性

  • width, height - 表格大小
  • border - 表格边框
  • border-collapse - 合并表格边框和单元格边框

奇偶选择器

:nth-child(odd/even)

1
2
3
4
tr:nth-child(odd){
background-color:#EAF2D3;
}
/* 奇行设置背景色 */

布局

盒子模型

  页面上所有元素看成一个盒子,占据一定的页面空间。

  • content - 内容
  • height - 高度
  • width - 宽度
  • border - 边框
  • padding - 内边距
  • margin - 外边距

  盒子的实际宽度、高度由contentpaddingbordermargin决定。以下为一个简单的盒子模型。

1
2
3
4
5
6
7
8
9
10
11
12
13
14
15
16
17
18
19
20
<html>
<head>
<style type="text/css">
#box{
width: 100px;
height: 100px;
border: 1px solid;
padding: 20px;
margin: 10px;
}
</style>
</head>
<body>
<div id="box">
Rua!Rua!Rua!
Rua!Rua!Rua!
Rua!Rua!Rua!
</div>
</body>
</html>

overflow

  上述例子中,内容可以超出盒子框,应该定义overflow属性来应对。它取值包括:

  • hidden - 超出部分不可见
  • scroll - 显示滚动条
  • auto - 如果有超出部分,显示滚动条

border

属性 描述
border width style color
border-width px thin medium thick
border-style dashed dotted solid double
border-color green #EAF2D3

  以水平分割线为例:

1
2
3
4
5
.line{
height:1px;
width:500px;
border-top:1px solid #e5e5e5;
}

  需要的时候定义class为line即可。

padding&margin

  由于浏览器默认对padding和margin有赋值,通常我们会对它们清零。

1
2
3
4
*{
margin:0;
padding:0;
}

  取值:px%(外层盒子的宽度和高度),对于margin:1px 2px 1px 3px;而言,分别是定义上、右、下、左的边距,对于margin:1px 2px;而言,相当于省略了,他们的取值与保持一致,也就是等同于margin:1px 2px 1px 2px;的效果。同理,如果是写3个值,相当于省略最后一个,其值等于

内边距 外边距 组成
padding:5px; margin:5px; 上右下左
padding-top:10%; margin-top:10%;
padding-left margin-left
padding-right margin-right
padding-bottom margin-bottom

  以下为例,值得注意的是div做盒子,会有换行的效果。margin会有合并的效果,具体而言:垂直方向合并,水平方向不合并

1
2
3
4
5
6
7
8
9
10
11
12
13
14
15
16
<html>
<head>
<style type="text/css">
div{
width: 100px;
height: 100px;
border: 1px solid red;
margin: 15px 10px 20px 30px;
}
</style>
</head>
<body>
<div id="box1">box1</div>
<div id="box2">box2</div>
</body>
</html>

  平时我们对图片文字水平居中,通常用text-align:center;,而div水平居中,可以用margin:0 auto;,浏览器自动计算。

定位

文档流flow

  除非专门指定,否则所有框均以此来定位。

none

  设置为这个的元素不会被显示。

1
2
3
a{
display:none;
}

block

  独占一行,元素的height、width、margin、padding都可设置。

  常见的block元素:divph1…h6olultableform

  将其他元素显示成block元素,以inline元素a为例:

1
2
3
a{
display:block;
}

inline

  不单独占用一行。

  width、height不可设置。

  width就是它包含的文字或图片的宽度,不可改变。

  常见的inline元素:spana

  显示为inline元素:

1
2
3
a{
display:inline;
}

  值得注意的是inline元素有间隙。

inline-block

  同时具备inline元素、block元素的特点。

  不单独占用一行。

  可以设置height、width、margin、padding。

  常见的inline-block元素:img

  显示为inline-block元素:

1
2
3
a{
display:inline-block;
}

示例

  以导航条为例:

1
2
3
4
5
6
7
8
9
10
11
12
13
14
15
16
17
18
19
20
21
22
23
24
25
26
27
28
29
30
31
32
33
34
35
36
37
38
39
40
41
42
<html>
<head>
<meta charset="UTF-8">
<title>mysite</title>
<style type="text/css">
*{
padding: 0;
margin: 0;
}
#nav_1{
width: 300px;
margin: 0 auto;
font-size: 0;
}
.nav_a{
display: inline-block;
width: 80px;
height: 30px;
font-size: 14px;
text-align: center;
line-height: 30px;
text-decoration: none;
border-bottom: 1px solid #ccc;
}
a.nav_a:hover{
color: white;
background-color: #ccc;
border: 1px solid;
border-left-color: orange;
border-top-color: orange;
border-right-color: orange;
}
</style>
</head>
<body>
<div id="nav_1">
<a class="nav_a" href="https://www.douyu.com/9999">Rua!</a>
<a class="nav_a" href="https://www.douyu.com/9999">Rua!!</a>
<a class="nav_a" href="https://www.douyu.com/9999">Rua!!!</a>
</div>
</body>
</html>

浮动float

float

  通过float属性来定位,例如div实现多列布局。

  以下为例,box1和box2就脱离了文档流原来位置(竖直摆放)。
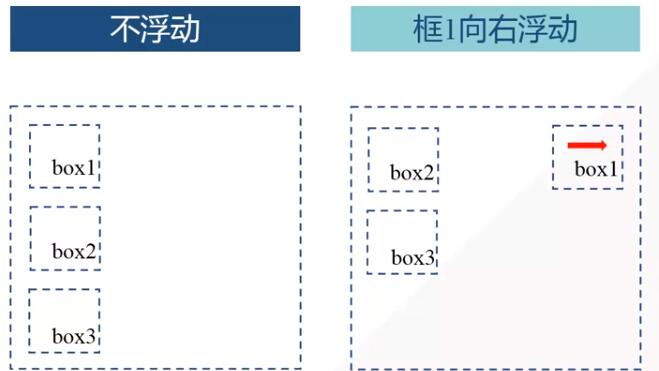
1
2
3
4
5
6
7
8
9
10
11
12
13
14
15
16
<html>
<head>
<style type="text/css">
div{
width: 100px;
height: 100px;
border: 1px solid red;
float: left;
}
</style>
</head>
<body>
<div id="box1">box1</div>
<div id="box2">box2</div>
</body>
</html>

clear

  用于清除浮动。

  • both,清除左右两边的浮动。
  • leftright只能清除一个方向的浮动。
  • none为默认值,只在需要移除已指定的清除值时用到。

  清除的意思是指该元素指定方向不会有浮动,用于浮动换行。比如要设置footer,不希望它左右两边有浮动元素:

1
2
3
#footer{
clear:both;
}

示例

  三行一列:

1
2
3
4
5
6
7
8
9
10
11
12
13
14
15
16
17
18
19
20
21
22
23
24
25
26
27
28
29
30
31
32
33
34
35
36
37
38
39
40
41
<html lang="en">
<head>
<meta charset="UTF-8">
<title>mysite</title>
<style>
*{
padding: 0;
margin: 0;
}
body{
font-size: 14px;
}
#container{
margin: 0 auto;
width: 1000px;
height: 500px;
}
#header{
height: 100px;
background-color: #6cf;
margin-bottom: 5px;
}
#main{
height: 500px;
background-color: #cff;
margin-bottom: 5px;
}
#footer{
height: 60px;
background-color: #6cf;
}
</style>
</head>
<body>
<div id="container">
<div id="header"></div>
<div id="main"></div>
<div id="footer"></div>
</div>
</body>
</html>

  一行两列:

1
2
3
4
5
6
7
8
9
10
11
12
13
14
15
16
17
18
19
20
21
22
23
24
25
26
27
28
29
30
31
32
33
34
35
36
37
38
39
<!DOCTYPE html>
<html lang="en">
<head>
<meta charset="UTF-8">
<title>mysite</title>
<style>
*{
padding: 0;
margin: 0;
}
body{
font-size: 14px;
}
#container{
margin: 0 auto;
width: 1000px;
height: 500px;
}
#aside{
float: right;
width: 695px;
height: 500px;
background-color: #6cf;
}
#content{
float: left;
width: 300px;
height: 500px;
background-color: #cff;
}
</style>
</head>
<body>
<div id="container">
<div id="aside"></div>
<div id="content"></div>
</div>
</body>
</html>

  组合为三行两列:

1
2
3
4
5
6
7
8
9
10
11
12
13
14
15
16
17
18
19
20
21
22
23
24
25
26
27
28
29
30
31
32
33
34
35
36
37
38
39
40
41
42
43
44
45
46
47
48
49
50
51
52
53
54
55
56
<!DOCTYPE html>
<html lang="en">
<head>
<meta charset="UTF-8">
<title>mysite</title>
<style>
*{
padding: 0;
margin: 0;
}
body{
font-size: 14px;
}
#container{
margin: 0 auto;
width: 1000px;
height: 500px;
}
#header{
height: 100px;
background-color: #6cf;
margin-bottom: 5px;
}
#main{
height: 500px;
margin-bottom: 5px;
}
#aside{
float: right;
width: 695px;
height: 500px;
background-color: #6cf;
}
#content{
float: left;
width: 300px;
height: 500px;
background-color: #cff;
}
#footer{
height: 60px;
background-color: #6cf;
}
</style>
</head>
<body>
<div id="container">
<div id="header"></div>
<div id="main">
<div id="aside"></div>
<div id="content"></div>
</div>
<div id="footer"></div>
</div>
</body>
</html>

  最后是四行三列:

1
2
3
4
5
6
7
8
9
10
11
12
13
14
15
16
17
18
19
20
21
22
23
24
25
26
27
28
29
30
31
32
33
34
35
36
37
38
39
40
41
42
43
44
45
46
47
48
49
50
51
52
53
54
55
56
57
58
59
60
61
62
63
64
65
66
67
68
69
<!DOCTYPE html>
<html lang="en">
<head>
<meta charset="UTF-8">
<title>mysite</title>
<style>
*{
padding: 0;
margin: 0;
}
body{
font-family: "微软雅黑";
font-size: 14px;
}
#container{
margin: 0 auto;
width: 900px;
}
#header{
height: 100px;
background-color: #6cf;
margin-bottom: 5px;
}
#nav{
height: 30px;
background-color: #09c;
margin-bottom: 5px;
}
#main{
height: 500px;
margin-bottom: 5px;
}
.aside{
float: left;
width: 100px;
height: 500px;
background-color: #6cf;
}
#aside1{
margin-right: 5px;
}
#aside2{
margin-left: 5px;
}
#content{
float: left;
width: 690px;
height: 500px;
background-color: #cff;
}
#footer{
height: 60px;
background-color: #6cf;
}
</style>
</head>
<body>
<div id="container">
<div id="header"></div>
<div id="nav"></div>
<div id="main">
<div id="aside1" class="aside"></div>
<div id="content"></div>
<div id="aside2" class="aside"></div>
</div>
<div id="footer"></div>
</div>
</body>
</html>

层layer

  通过position属性来定位。目的是希望网页的元素能叠加在另外一个元素上面,能像图像软件中的图层一样可以对每个layer能够精确定位操作。

static

  默认值,没有定位,元素出现在正常的流中,topbottomleftrightz-index无效。

  z-index:定义层叠顺序,越大则处于更前。

fixed

  固定定位,相对于浏览器窗口进行定位,topbottomleftrightz-index有效。

1
2
3
4
5
6
7
8
9
#fixed-box{
width: 200px;
height: 200px;
border: 1px solid red;

position: fixed;
left: 100px;
top: 50px;
}

relative

  相对定位,相对于其直接父元素进行定位,topbottomleftrightz-index有效。

  定位为relative的层脱离正常文本流,但其在正常流的原位置存在

1
2
3
4
5
6
7
8
#relative-box{
width: 170px;
height: 190px;

position: relative;
left: 20px;
top: 20px;
}

absolute

  绝对定位,相对于static定位以外的第一个父元素进行定位,topbottomleftrightz-index有效。

  定位为absolute的层脱离正常文本流,但与relative的区别是:其在正常流的原位置不再存在

  对于absolute定位的层总是相对于其最近的定义为absolute或relative的父层,而这个父层并不一定是其直接父层。

  极端而言,对于absolute定位的层,如果其父层中都未定义absolute或relative,则其将相对body进行定位。

  总结而言:

相对定位 绝对定位
position取值 relative absolute
文档流中原位置 保留 不保留
定位参照物 直接父元素 非static的父元素

relative+absolute

  通常按照如下思路来定位:

  • 父元素box1:position:relative;
  • 子元素box2:position:absolute;
  • 子元素box2:top、bottom、left、right相对于父元素来进行偏移定位。

  类似如此:

1
2
3
4
5
6
7
8
9
10
11
#box1{
position:relative;
}
#box2{
position:absolute;
}

<div id="box1">
<div id="box2">
</div>
</div>

  举例而言,如果对于定义一副图片+图片说明,可以这样写:

1
2
3
4
5
6
7
8
9
10
11
12
13
14
15
16
17
18
19
20
21
<style>
div{
border: 1px solid red;
color: #fff;
}
#box1{
width: 170px;
height: 190px;
position: relative;
}
#box2{
width: 99%;
position: absolute;
bottom: 0;
}
</style>

<div id="box1">
<img src="coffee.jpg" alt="coffee">
<div id="box2">一起享受咖啡带来的温暖吧</div>
</div>

CSS3

  由于W3C对标准更新速度较慢,所以浏览器会先于标准制定对新标准的支持。对于不同的浏览器,有不同的CSS3前缀:

浏览器内核 浏览器 CSS3前缀
Webkit Safari/Chrome -webkit-
Gecko Firefox -moz-
Presto Opera -o-
Trident IE -ms-

边框

border-radius

  圆角边框,由border-top-left-radiusborder-top-right-radiusborder-bottom-left-radiusborder-bottom-right-radius组成。

  如果填两个值,即为水平值垂直值,如果只填一个,则默认两值相等。

1
2
3
4
5
6
7
div{
height: 100px;
width: 150px;
border: 1px solid blue;
border-top-left-radius: 40px 20px;
border-bottom-right-radius: 20px;
}

  也可以直接通过设置border-radius来一次定义四个边角的框。

1
2
3
4
5
6
7
div{
height: 50px;
width: 350px;
border: 2px solid #alalal;
background: #ddd;
border-radius: 25px;
}

box-shadow

  阴影,可以有内部阴影inset外部阴影outset两种,默认外部阴影。

  四个参数分别是:水平偏移,垂直偏移,模糊距离,颜色。

1
2
3
4
5
6
div{
height: 100px;
width: 300px;
background-color: #f90;
box-shadow: 10px 10px 5px #888;
}

文本

text-shadow

  设置文本阴影。四个参数分别指水平偏移,垂直偏移,阴影大小(可省略),颜色。

1
2
3
4
5
6
h1{
text-shadow: 2px 2px #FF0000;
}
h1{
text-shadow: 2px 2px 8PX blue;
}

  常用于文字描边,比如:

1
2
3
h1{
text-shadow: 0 0 3px #F00;
}

  又比如用来做突起浮雕的效果:

1
2
3
4
h1{
color: white;
text-shadow: 2px 2px 4px #000;
}

word-wrap

  允许长单词,URL 强制进行换行。如果不设置,长单词可能会溢出边框外。

1
2
3
4
5
6
7
8
9
10
11
<style>
p.wdrp{
width: 8em;
border: 1px solid #333;
word-wrap: break-word;
}
</style>

<body>
<p class='wdrp'>这是最长的英文单词:pneumonoultramicroscopicsilicovolcanoconiosis</p>
</body>

@font-face规则

  即把特殊字体放在服务器端。根据@font-face规则,定义Web字体,并引用需要字体的四种格式,确保能在主流浏览器中都能正常显示该字体。

字体文件后缀 适用于浏览器
.TTF或.OTF Firefox、Safari、Opera
.EOT Internet Explorer 4.0+
.SVG Chrome、IPhone
.WOFF Chrome、Firefox

  其定义格式如下:

1
2
3
4
5
6
7
8
9
10
11
12
13
14
15
<style>
@font-face{
/** 定义字体名称 **/
font-family: kastlerFont;
/** 定义字体来源 **/
src:url('fonts/kastler.ttf'),
url('fonts/kastler.eot'),
url('fonts/kastler.woff'),
url('fonts/kastler.svg');
}
p{
/** 引用字体 **/
font-family: kastlerFont;
}
</style>

2D转换

  CSS3中2D转换主要包括对元素进行旋转缩放、移动、拉伸。

  主要是用transform属性,rotate()、scale()。

rotate

  示例如下:

1
2
3
4
5
6
7
8
9
10
11
12
13
14
15
16
17
<style>
div{
width: 8em;
height: 75px;
background-color: #ccc;
border: 1px solid black;
}
#rotateDiv{
/** 正值代表顺时针旋转 **/
transform: rotate(30deg);
}
</style>

<div id="container">
<div>峰哥牛逼</div>
<div id="rotateDiv">峰哥牛逼</div>
</div>

scale

  以transform: scale(x,y)为例,x代表水平方向缩放倍数,y代表垂直方向缩放倍数,省略同x,倍数取值0~1代表缩小,大于1为放大。

1
2
3
#scaleDiv{
transform: scale(1.2);
}

过渡与动画

过渡

  用transition表示,主要是把元素的某个属性从一个值在指定时间内过渡到另一个值,包括:

属性 描述
transition 简写,同时在一个属性中设置四个过渡属性
transition-property 属性名,对哪个属性进行变化,所以属性可以用all表示
transition-duration 定义过渡效果花费的时间,默认是 0
transition-timing-function 过渡效果的方法函数,默认是 “ease”
transition-delay 规定过渡效果何时开始,默认是 0

  示例:

1
2
3
4
5
6
7
8
9
10
11
12
13
14
15
16
17
18
19
20
21
22
<html>
<head>
<style type="text/css">
#transition_demo{
height: 30px;
width: 100px;
line-height: 30px;
border-radius: 5px;
color: #000;
background-color: silver;
transition: all 1s linear;
}
#transition_demo:hover{
color: white;
background-color: #45b823;
}
</style>
</head>
<body>
<div id="transition_demo">Rua!</div>
</body>
</html>

动画

  主要用@keyframes规则 ,animation属性。包含如下

属性 描述
@keyframes 规定动画
animation 所有动画属性的简写属性
animation-name 引入 @keyframes 动画的名称
animation-duration 规定动画完成一个周期所花费的秒或毫秒
animation-timing-function 规定动画的速度曲线,默认是 “ease”
animation-play-state 规定动画何时开始。默认是 0。
1
2
3
4
5
6
7
8
9
10
11
12
13
14
15
16
17
18
19
20
21
22
<html>
<head>
<style type="text/css">
@keyframes mycolor {
0%
{background-color: red;}
30%
{background-color: blue;}
60%
{background-color: yellow;}
100%
{background-color: green;}
}
#keyframes_demo:hover{
animation: mycolor 5s linear;
}
</style>
</head>
<body>
<div id="keyframes_demo">Rua!</div>
</body>
</html>

3D变换

  用transform-style: preserve-3d,常用的有旋转透视

  通常用嵌套形式设置,里面的对象称为父容器,设置transform属性,外面的对象称为舞台,设置perspective属性。

旋转

  transform属性,角度deg:

  • rotateX()
  • rotateY()
  • rotateZ()

透视

  perspective属性。

JavaScript

  JavaScript是一种运行于JavaScript解释器/引擎中的解释型脚本语言。

基本

引用

  类似于CSS,可以在html文件中任意地方使用,也可以用 <script src="..."></script>引入这个文件,注意如果引用外部文件,里面不能再有js代码了。

语法

  • 类似Java,每句用结束。
  • 大小写敏感
  • //单行注释,/* */多行注释

变量

  声明,var变量名。不申明即为全局变量,可能会出现冲突。

1
2
3
4
//声明
var userName;
//赋值
var bookPrice=25.5;

运算符

  值得注意的是与Python不一样的有:

  • 比较运算符,==会转换数据类型,为了避免有bug应用===,这样不会转换数据类型。

  • Python的递增我们一般用i+=1,这里用i++即可。

  • 逻辑运算符, 与&& ,或 || ,三元运算符变量= (条件) ? 值A:值B

    1
    2
    3
    4
    5
    //例如:
    var age = 20;
    var msg = age > 18 ? "成年" : "未成年";
    console.log(msg);
    //"成年"

    可以嵌套:

    1
    2
    3
    4
    var score = 55;
    var result = score >= 80 ? "优秀" : (score >= 60 ? "及格" : "不及格");
    console.log(result);
    //"不及格"

函数

  最基本:

1
2
3
4
5
6
7
8
9
10
11
function 函数名(){
可执行语句;
}
//e.g.
function printHello(){
console.log("Hello,");
console.log("World!");
}
printHello();
/* Hello,
World! */

  带参数:

1
2
3
4
5
6
7
8
9
function 函数名(参数列表声明){
可执行语句;
}
//e.g.
function printInfo(userName,userPwd){
console.log('用户名:'+userName + ' 密码:'+userPwd);
}
printInfo('Tom','123');
// 用户名:Tom 密码:123

  带返回值:

1
2
3
4
5
6
7
8
9
10
11
function 函数名(参数列表声明){
可执行语句;
return 值;
}
//e.g.
function add(num1,num2){
return num1 + num2;
}
var result = add(10,20);
console.log('结果是:'+result);
// 结果是:30

  注意函数作用域里面的变量(局部变量)只在当前函数能访问,离开此范围就无法访问了。

1
2
3
4
5
6
function add(){
var sum = 1 + 2;
console.log(sum);
}
console.log(sum);
// Uncaught ReferenceError: sum is not defined

  参数按值传递,传参的时候实际上是将实参复制一份传给函数,在函数体内对变量进行修改,实际上不影响外部实参变量。

1
2
3
4
5
6
7
var n=100;    //全局变量
function fun(n){ //参数变量
n-=3; //修改的是局部变量n
console.log(n); //输出的是局部变量
}
fun(n); //按值传递,方法内输出97
console.log(n); //输出全局变量的值:100

流程控制

条件判断

if-else结构

1
2
3
4
5
6
7
8
9
10
11
12
13
14
15
16
17
18
19
20
// if
if(条件表达式){
语句块;
}
// 带else
if(条件表达式){
语句块1;
}else{
语句块2;
}
// 带else if
if(条件1){
语句块1;
}else if(条件2){
语句块2;
}else if(条件3){
语句块3;
}else{
语句块4;
}

switch-case结构

  通常用于等值判断的条件中,满足case条件执行,但是因为执行后会执行后面的语句,所以需要和break联用。

1
2
3
4
5
6
7
8
9
10
11
12
switch(表达式){
case1:
语句1;
语句2;
break;
case2:
语句3;
break;
......
default:
语句n;
}

循环

while循环

1
2
3
4
5
6
7
8
9
10
11
12
13
14
15
16
17
18
19
while(表达式){
循环体语句;
}
//e.g.
var i=0;
while(i<10){
console.log('Hello,world!');
i++;
}
// 类似python,也有continue和break
// e.g.
var i=0;
while(i<100){
console.log(i);
if(i==5){
break;
}
i++;
}

do-while循环

1
2
3
do{
循环体语句;
}while(表达式);

for循环

1
2
3
4
5
6
7
for(表达式1(初始条件);表达式2(判断条件);表达式3(递增条件)){
循环体;
}
//e.g.
for(var i=0;i<10;i++){
console.log(i);
}

  for循环的三个条件可以省略,如果没有break会无限循环下去。

for-in循环

1
2
3
4
5
6
7
8
9
var o = {
name: 'Jack',
age: 20,
city: 'Beijing'
};
for (var key in o) {
console.log(key);
}
// 'name', 'age', 'city'

数组

索引数组

  类似python列表或者numpy的array。

1
2
3
4
// 直接创建
var arr=[];
// 用new
var arr=new Array();

  用索引来添加:

1
2
3
4
5
6
7
// 如果添加没按顺序,则中间会被empty补位
var empArray = [];
empArray[0] = "pis";
empArray[1] = "2009";
empArray[3] = "yyf";
console.log(empArray);
// ["pis", "2009", empty, "yyf"]

  通过arr.length赋值,可以达到缩容的目的。

关联数组

  有点类似python的字典,用于描述对象

1
2
3
var bookInfo =[];
bookInfo['bookName']='西游记';
bookInfo['price']=35.5;

数组函数

  • String(arr):转成字符串。

  • arr.join(“连接符”):类似于python的join,语法稍有区别。

  • arr.concat():拼接并返回新数组。

    1
    2
    3
    4
    5
    6
    7
    8
    var arr1=[90,91,92];
    var arr2=[80,81];
    var arr3=[70,71,72,73];
    var arr4=arr1.concat(50,60,arr2,arr3);
    console.log(arr1);
    // [90, 91, 92]
    console.log(arr4);
    // [90, 91, 92, 50, 60, 80, 81, 70, 71, 72, 73]
  • arr.slice():类似于切片。 省略第二个参数,相当于于python切片的,选取到结尾;省略所有参数则是相当于复制数组。

    1
    2
    3
    4
    5
    6
    7
    8
    9
    var arr1=[10,20,30,40,50];
    var arr2=arr1.slice(1,4);
    // [20, 30, 40]
    var arr3=arr1.slice(2);
    // [30, 40, 50]
    var arr4=arr1.slice(-4,-2);
    // [20, 30]
    console.log(arr1);
    // [10, 20, 30, 40, 50]
  • arr.splice(i,n(,…)):删除arr中i位置开始的n个元素不考虑含头,直接修改原数组,返回值则会保存被删除元素组成的数组;如果加入后面的参数,则会在删除位置插入后面输入的元素,这样通过修改n可以达到不同目的,如n=0,则为插入效果,n与后面元素数字相等相当于替换效果。

    1
    2
    3
    4
    5
    6
    7
    8
    9
    10
    11
    12
    13
    14
    15
    16
    17
    var arr1=[10,20,30,40,50];
    var arr2=arr1.splice(2,1);
    console.log(arr1);
    // [10, 20, 40, 50]
    console.log(arr2);
    // [30]

    var arr3=arr1.splice(2,2,21,22,23);
    var arr4=arr1.splice(2,2,[91,92,93]);
    console.log(arr1);
    // [10, 20, 21, 22, 23, 50]
    console.log(arr3);
    // [30, 40]
    console.log(arr1);
    // [10, 20, Array(3), 50]
    console.log(arr4);
    // [30, 40]
  • arr.reverse():颠倒数组顺序。

  • arr.sort():排序,不过只能排字符串类型。

DOM

  DOM(document object model),可以用于对网页增删改查。

查找

  • 按id,var elem=document.getElementById("id")

    1
    2
    3
    4
    5
    6
    7
    <ul id="myList">
    <li id="m1">yyf</li>
    <li id="m2">2009</li>
    <li id="m3">pis</li>
    </ul>
    var ul=document.getElementById("myList");
    console.log(ul);
  • 按标签名,var elem=parent.getElementsByTagName("tag"),直接查找parent节点下所有标签为tag的子代节点,返回一个动态集合,就算只有一个也要用[0]来取出。

    1
    2
    3
    4
    5
    6
    7
    8
    <ul id="myList">
    <li id="m1">yyf</li>
    <li id="m2">2009</li>
    <li id="m3">pis</li>
    </ul>
    var ul=document.getElementById("myList");
    var list=ul.getElementsByTagName("li");
    console.log(list);
  • 按name,var elem=document.getElementsByName("name"),返回所有子集合。

    1
    2
    3
    4
    5
    6
    7
    8
    <form id="registerForm">
    <input type="checkbox" name="boy" />
    <input type="checkbox" name="boy" />
    <input type="checkbox" name="boy" />
    </form>
    var list=document.getElementsByName("boy");
    console.log(list);
    console.log(typeof list);
  • 按class,var elem=parent.getElementsByClassName("class")

    1
    2
    3
    4
    5
    6
    7
    8
    <div id="news">
    <p class="mainTitle">title1</p>
    <p class="subTitle">title2</p>
    <p class="mainTitle">title3</p>
    </div>
    var div=document.getElementById("news");
    var list=div.getElementsByClassName("mainTitle");
    console.log(list);
  • 按CSS选择器:

    只找一个元素:var elem=parent.querySelector("selector"),如果有多个也只返回一个,类似于bs4。

    找多个:var elems=parent.querySelectorAll("selector")

核心

  • 读取属性值,有点类似bs4的操作:

    1
    2
    3
    4
    5
    6
    // 先获得属性节点对象,再获得节点对象的值
    var attrNode=elem.attributes[下标/属性名];
    var attrNode=elem.getAttributeNode(属性名);
    attrNode.value; //属性值
    // 直接获得属性值
    var value=elem.getAttribute("属性名");
  • 修改的时候,用set方法:

    1
    2
    var h1=document.getElementById("a1");
    h1.setAttributeNode("name",zhangji);
  • 判断是否包含指定属性:

    1
    2
    3
    var bool=elem.hasAttribute("属性名");
    //e.g.
    document.getElementById("bt1").hasAttribute("onclick");
  • 移除属性:

    1
    2
    3
    4
    5
    elem.removeAttribute("属性名");
    //e.g.
    <a id="alink" class="slink" href="javascript:void(0)" onlick="jump()">百度搜索</a>
    var a=document.getElementById("alink");
    a.removeAttribute("class")
  • 修改样式:

    1
    2
    3
    4
    5
    6
    7
    // 内联样式
    elem.style.属性名;
    // 强调
    属性名:去横线,变驼峰;
    // e.g.
    css:background-color=>backgroundColor;
    list-style-type=>listStyleType;

添加

  • 创建空元素。

    1
    2
    3
    4
    5
    6
    7
    var elem=document.createElement("元素名");
    //e.g.
    var table=document.createElement("table");
    var tr=document.createElement("tr");
    var td=document.createElement("td");
    var td=document.createElement("td");
    console.log(table);
  • 设置关键属性。

    1
    2
    3
    a.innerHTML="yyfyyf123";
    a.href="https://www.douyu.com/9999";
    //<a href="https://www.douyu.com/9999">yyfyyf123</a>
  • 设置关键样式。

    1
    2
    3
    4
    // 修改某一项
    a.style.opacity="1";
    // 批量修改
    a.style.cssText="width:100px;height:100px";
  • 将元素添加到DOM树,parentNode.appendChild(childNode),可用于为一个父元素追加一个子节点。

    1
    2
    3
    4
    var div=document.createElement("div");
    var txt=document.createTextNode("版权说明");
    div.appendChild(txt);
    document.body.appendChild(div);

    parentNode.insertBefore(newChild,existingChild),用于在父元素中的指定子节点之前添加一个新的子节点。

    1
    2
    3
    4
    5
    6
    7
    <ul id="menu">
    <li>首页</li>
    <li>联系我们</li>
    </ul>
    var ul=document.getElementById("menu");
    var newLi=document.createElement("li");
    ul.insertBefore(newLi,ul.lastChild);
  • 注意:尽量要少操作DOM树,避免每次重新layout。优化思路:1.如果同时创建父元素和子元素时,建议在内存中先将子元素添加到父元素,再讲父元素一次性挂到页面;2.如果只添加多个平级子元素时,就要将所有子元素临时添加到文档片段中,再将文档片段整体添加到页面。

    1
    2
    3
    4
    5
    6
    7
    // 创建片段(相当于虚拟父元素)
    var frag=document.createDocumentFragment();
    // 将子元素临时追加到frag中
    frag.appendChild(child);
    // 将frag追加到页面
    parent.appendChild(frag);
    // append之后,frag自动释放,不会占用元素

BOM

  BOM(browser object model),操作浏览器窗口,可能有兼容性问题。

基本

  • window:代表整个窗口。

    1
    2
    3
    4
    // 获取当前窗口大小
    window.outerWidth/outerHeight;
    // 文档显示区大小
    window.innerWidth/innerHeight;
  • history:封装当前窗口打开后,成功访问过的历史url记录。

  • navigator:封装浏览器配置信息。

  • document:封装当前正在加载的网页内容。

  • location:封装了当前窗口正在打开的url地址。

  • screen:封装了屏幕的信息。

  • event:定义了网页中的事件机制。

定时器

周期性定时器

  语法:

  • setInterval(exp,time):周期性触发代码exp。
  • exp:执行语句。
  • time:时间周期,单位为毫秒。
1
2
3
setInterval(function()){
console.log("Rua!!!");
},1000);

停止定时器

  • 给定时器取名:

    1
    2
    3
    var timer=setInterval(function()){
    console.log("Rua!!!");
    },1000);
  • 停止定时器:

    1
    claerInterval(timer);

一次性定时器

  让程序延迟一段时间运行,语法:

  • setTimeout(exp,time):一次性触发代码exp。
  • exp:执行语句。
  • time:间隔时间,单位为毫秒。
1
2
3
setTimeout(function()){
alert("Rua!!!");
},3000);

JQuery

  类似于插件库,稍作了解。

概述

工厂函数$()

评论

3D cell culture 3D cell culturing 3D cell microarrays 3D culture 3D culture model 3D printing 3D spheroid 3D tumor culture 3D tumors 3D vascular mapping ACT ADV AUTODESK Abdominal wall defects Acoustofluidics Adipocyte Adipogenesis Adoptive cell therapy AirPods Alginate Anticancer Anticancer agents Anticancer drugs Apple Apriori Association Analysis August AutoCAD Autodock Vina Bio-inspired systems Biochannels Bioengineering Bioinspired Biological physics Biomarkers Biomaterial Biomaterials Biomimetic materials Biomimetics Bioprinting Blood purification Blood-brain barrier Bone regeneration Breast cancer Breast cancer cells Breast neoplasms CM1860 CRISPR/Cas9 system CSS CTC isolation CTCs Cancer Cancer angiogenesis Cancer cell invasion Cancer immunity Cancer immunotherapy Cancer metabolism Cancer metastasis Cancer models Cancer screening Cancer stem cells Cell adhesion Cell arrays Cell assembly Cell clusters Cell culture Cell culture techniques Cell mechanical stimulation Cell morphology Cell trapping Cell-bead pairing Cell-cell interaction Cell-laden gelatin methacrylate Cellular uptake Cell−cell interaction Cervical cancer Cheminformatics Chemotherapy Chimeric antigen receptor-T cells Chip interface Circulating tumor cells Clinical diagnostics Cmder Co-culture Coculture Colon Colorectal cancer Combinatorial drug screening Combinatorial drug testing Compartmentalized devices Confined migration Continuous flow Convolutional neural network Cooking Crawler Cryostat Curved geometry Cytokine detection Cytometry Cytotoxicity Cytotoxicity assay DESeq DNA tensioners Data Mining Deep learning Deformability Delaunay triangulation Detective story Diabetic wound healing Diagnostics Dielectrophoresis Differentiation Digital microfluidics Direct reprogramming Discrimination of heterogenic CTCs Django Double emulsion microfluidics Droplet Droplet microfluidics Droplets generation Droplet‐based microfluidics Drug combination Drug efficacy evaluation Drug evaluation Drug metabolism Drug resistance Drug resistance screening Drug screening Drug testing Dual isolation and profiling Dynamic culture Earphone Efficiency Efficiency of encapsulation Elastomers Embedded 3D bioprinting Encapsulation Endothelial cell Endothelial cells English Environmental hazard assessment Epithelial–mesenchymal transition Euclidean distance Exosome biogenesis Exosomes Experiment Extracellular vesicles FC40 FP-growth Fabrication Fast prototyping Fibroblasts Fibrous strands Fiddler Flask Flow rates Fluorescence‐activated cell sorting Functional drug testing GEO Galgame Game Gene Expression Profiling Gene delivery Gene expression profiling Gene targetic Genetic association Gene‐editing Gigabyte Glypican-1 GoldenDict Google Translate Gradient generator Growth factor G‐CSF HBEXO-Chip HTML Hanging drop Head and neck cancer Hectorite nanoclay Hepatic models Hepatocytes Heterotypic tumor HiPSCs High throughput analyses High-throughput High-throughput drug screening High-throughput screening assays High‐throughput methods Histopathology Human neural stem cells Human skin equivalent Hydrogel Hydrogel hypoxia Hydrogels ImageJ Immune checkpoint blockade Immune-cell infiltration Immunoassay Immunological surveillance Immunotherapy In vitro tests In vivo mimicking Induced hepatocytes Innervation Insulin resistance Insulin signaling Interferon‐gamma Intestinal stem cells Intracellular delivery Intratumoral heterogeneity JRPG Jaccard coefficient JavaScript July June KNN Kidney-on-a-chip Lab-on-a-chip Laptop Large scale Lattice resoning Leica Leukapheresis Link Lipid metabolism Liquid biopsy Literature Liver Liver microenvironment Liver spheroid Luminal mechanics Lung cells MOE Machine Learning Machine learning Macro Macromolecule delivery Macroporous microgel scaffolds Magnetic field Magnetic sorting Malignant potential Mammary tumor organoids Manhattan distance Manual Materials science May Mechanical forces Melanoma Mesenchymal stem cells Mesoporous silica particles (MSNs) Metastasis Microassembly Microcapsule Microcontact printing Microdroplets Microenvironment Microfluidic array Microfluidic chips Microfluidic device Microfluidic droplet Microfluidic organ-on-a chip Microfluidic organ-on-a-chip Microfluidic patterning Microfluidic screening Microfluidic tumor models Microfluidic-blow-spinning Microfluidics Microneedles Micropatterning Microtexture Microvascular Microvascular networks Microvasculatures Microwells Mini-guts Mirco-droplets Molecular docking Molecular imprinting Monolith Monthly Multi-Size 3D tumors Multi-organoid-on-chip Multicellular spheroids Multicellular systems Multicellular tumor aggregates Multi‐step cascade reactions Myeloid-derived suppressor cells NK cell NanoZoomer Nanomaterials Nanoparticle delivery Nanoparticle drug delivery Nanoparticles Nanowell Natural killer cells Neural progenitor cell Neuroblastoma Neuronal cell Neurons Nintendo Nissl body Node.js On-Chip orthogonal Analysis OpenBabel Organ-on-a-chip Organ-on-a-chip devices Organically modified ceramics Organoids Organ‐on‐a‐chip Osteochondral interface Oxygen control Oxygen gradients Oxygen microenvironments PDA-modified lung scaffolds PDMS PTX‐loaded liposomes Pain relief Pancreatic cancer Pancreatic ductal adenocarcinoma Pancreatic islet Pathology Patient-derived organoid Patient-derived tumor model Patterning Pearl powder Pearson coefficient Penetralium Perfusable Personalized medicine Photocytotoxicity Photodynamic therapy (PDT) Physiological geometry Pluronic F127 Pneumatic valve Poetry Polymer giant unilamellar vesicles Polystyrene PowerShell Precision medicine Preclinical models Premetastatic niche Primary cell transfection Printing Protein patterning Protein secretion Pubmed PyMOL Pybel Pytesseract Python Quasi-static hydrodynamic capture R RDKit RNAi nanomedicine RPG Reactive oxygen species Reagents preparation Resistance Review Rod-shaped microgels STRING Selective isolation Self-assembly Self-healing hydrogel September Signal transduction Silk-collagen biomaterial composite Similarity Single cell Single cells Single molecule Single-cell Single-cell RNA sequencing Single‐cell analysis Single‐cell printing Size exclusion Skin regeneration Soft lithography Softstar Spheroids Spheroids-on-chips Staining StarBase Stem cells Sub-Poisson distribution Supramolecular chemistry Surface chemistry Surface modification Switch T cell function TCGA Tanimoto coefficient The Millennium Destiny The Wind Road Thin gel Tissue engineering Transcriptome Transfection Transient receptor potential channel modulators Tropism Tubulogenesis Tumor environmental Tumor exosomes Tumor growth and invasion Tumor immunotherapy Tumor metastasis Tumor microenvironment Tumor response Tumor sizes Tumor spheroid Tumor-on-a-chip Tumorsphere Tumors‐on‐a‐chip Type 2 diabetes mellitus Ultrasensitive detection Unboxing Underlying mechanism Vascularization Vascularized model Vasculature Visual novel Wettability Windows Terminal Word Writing Wuxia Xenoblade Chronicles Xin dynasty XuanYuan Sword Youdao cnpm fsevents miR-125b-5p miR-214-3p miRNA signature miRanda npm
Your browser is out-of-date!

Update your browser to view this website correctly. Update my browser now

×